Setup
This page covers everything needed to get the assistant running: the built-in setup wizard and, as an alternative, manual iTop configuration.
Setup wizard
The wizard opens automatically at http://localhost:8001/ui when the assistant is not yet configured. A welcome screen comes first; after it, four steps, each testing its connection before moving on.
Important
Before starting the wizard, create the AI service account in iTop manually — the wizard does not do this. See Create a service account below.
Welcome screen
What this is, the licence it is under, and this installation's own anonymous identifier — a random value it generated for itself on first start, worth noting down: it is what a support request or a "delete my data" request names.
The screen also carries the switch for anonymous usage telemetry, which is on. It sits here rather than at the end of the wizard for a concrete reason: the first document is sent the moment the last step is saved, so a switch shown only afterwards would come too late to refuse anything. Nothing on this screen blocks Start setup or waits for an answer — turn it off if you want to, and carry on either way.
Step 1 — Security
Set two tokens — either type your own or click Generate to create a cryptographically random value. Copy and save both tokens before leaving this screen — they are not shown again.
- Webhook Token — a shared secret the assistant requires in every request from iTop (
X-Auth-Tokenheader). Protects the webhook endpoint from unauthorized calls. - Admin Token — a bearer token for the admin UI and API (
Authorization: Bearer). Until it is set, the admin API is open to anyone on the network (first-run mode); the wizard closes that by saving the token. Save this token — you will need to enter it every time you open the admin UI.
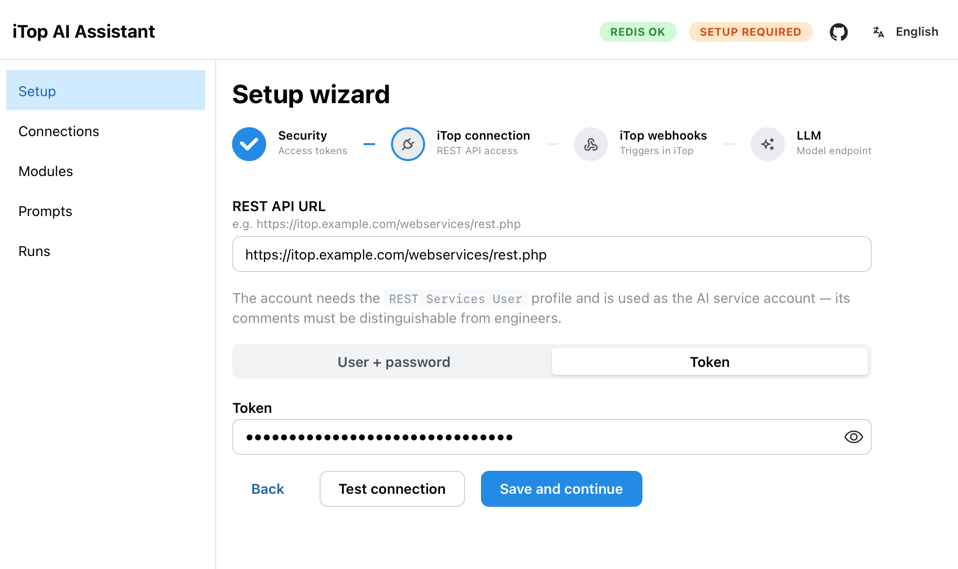
Step 2 — iTop connection
Enter the iTop REST API URL and the credentials of the AI service account you created in the prerequisite step:
- REST API URL — typically
http://your-itop/webservices/rest.php - Auth method — application token (recommended) or username + password
Click Test connection to verify before saving. The test returns the login name of the service account — confirm it matches the account you created.
Step 3 — iTop webhooks
This step creates the triggers and webhooks in iTop automatically, using one-time admin credentials (entered here, never stored). The assistant creates:
| Object | Purpose |
|---|---|
RemoteApplicationType + RemoteApplicationConnection |
iTop connection config for the assistant, including the X-Auth-Token header |
TriggerOnObjectCreate |
One trigger on Ticket, filtered to UserRequest and Incident — fires when a new ticket is created |
TriggerOnObjectUpdate |
One per ticket class — fires when someone posts to the public log |
ActionWebhook × 2 |
Sends POST /webhook — one for creation, one shared by the update triggers |
Classes missing from your datamodel are skipped rather than failing the step, and objects that already exist (matched by name) are left untouched — re-running is safe. You can skip this step and create the iTop objects manually (see below).
Important
The Backend URL field (auto-filled from the browser) must be the address at which the iTop server can reach the assistant — not necessarily localhost. In Docker Compose, that is http://assistant:8000.
Step 4 — LLM connection
Enter your LLM connection details:
- Provider — how the model is reached:
openai_compatible(default; anything serving/chat/completions— LM Studio, vLLM, LiteLLM, DeepSeek, Azure, OpenRouter),openai,google_genaiorollama. The rest of the form follows this choice — fields the provider does not use are hidden. See Configuration → LLM providers - Base URL — the endpoint; not shown for
openaiandgoogle_genai - Model — the model name exactly as the endpoint exposes it
- API key — required by the cloud providers, ignored by local servers
Click Test LLM to verify before saving. The probe checks two things: that the model answers, and that it can call a tool — the assistant is one tool-calling agent, so a model that only writes prose cannot do the job.
Tip
Model parameters (temperature, max tokens) and the forced-tool_choice switch are not part of the wizard — set them afterwards in Connections → LLM.
Once all four steps are complete, /webhook becomes active and iTop will start sending tickets to the assistant.
Try it on your own data first
Before the assistant writes anything a requester will read, you can watch it work on your real queue without a single change reaching iTop. Switch on Dry run (Modules screen, or DRY_RUN=true — see Dry run) and leave it on for as long as it takes to see enough tickets: every new ticket is processed exactly as it would be in production, and every run is recorded in Runs with the full text of the question the requester would have received, the note the engineer would have got, and the classification in service and subcategory names.
Read a few of those runs, tune the prompts and the catalogue OQL if you disagree with them, and switch the mode off when you are satisfied. Nothing else has to be changed: the same runs, the same decisions, only the writes come back.
Two things this check cannot show you, worth knowing before you rely on it:
- No conversation with the requester. The clarifying question is never published, so nobody answers it. You are checking the classification, the decision to ask or hand over, the wording of the question and the quality of the note — not whether the assistant asks a good second question after hearing an answer.
- No replay of your ticket archive. Solved tickets already carry the whole conversation and a classification, so running the assistant over them would show it solving a different problem from the one it faces on a new ticket. The check runs on the live queue: as many tickets as arrive while the mode is on.
Also keep in mind that a ticket processed during the dry run is marked as processed. When the mode goes off, the assistant does not come back to it — by then it has usually been picked up by an engineer anyway; the few that matter are quicker to handle by hand.
iTop configuration
If you skipped Step 3 of the wizard, or need to understand what was created, here is the full manual setup.
1. Create a service account
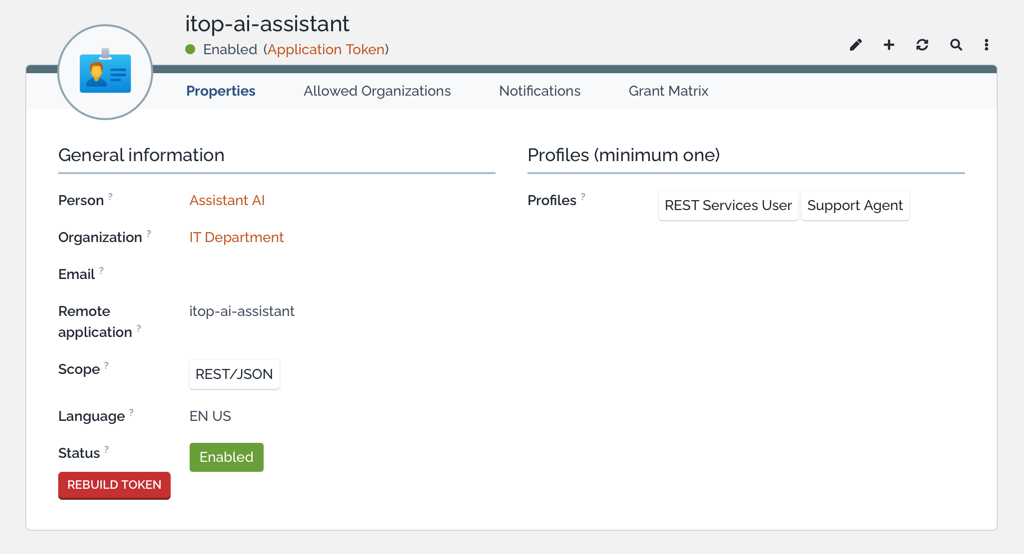
Create a dedicated iTop user account for the assistant (Administration → User accounts). Use Application Token authentication — no password needed.
The account needs the following profiles: - REST Services User — for API access - Service Desk Agent or equivalent — for read access to tickets and the ability to post to logs
All comments posted by the assistant will appear under this account name, making AI actions visible and auditable in the ticket log. Use this account's token for ITOP_TOKEN (or ITOP_USER / ITOP_PWD) in your .env.
2. Configure service subcategories
The assistant uses the description field of each service subcategory as its completeness criteria — it checks whether the ticket contains everything listed there before deciding to ask a question or hand the ticket to an engineer.
Go to each subcategory you want the assistant to handle and write a short description of what information is required:
Hardware equipment failures and malfunctions.
Required information: device manufacturer and model, operating system, exact error message or failure symptom.
Keep it factual and specific — the more precise the description, the better the questions the assistant will ask.
3. Create triggers
Create two triggers in iTop (Configuration → Notifications → Triggers):
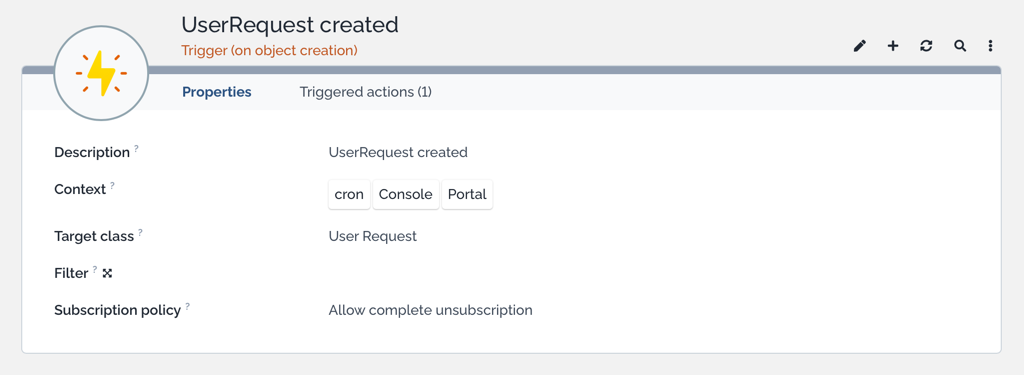
Trigger 1 — ticket created:
| Field | Value |
|---|---|
| Type | Trigger (on object creation) |
| Target class | UserRequest |
| Context | cron, Console, Portal |
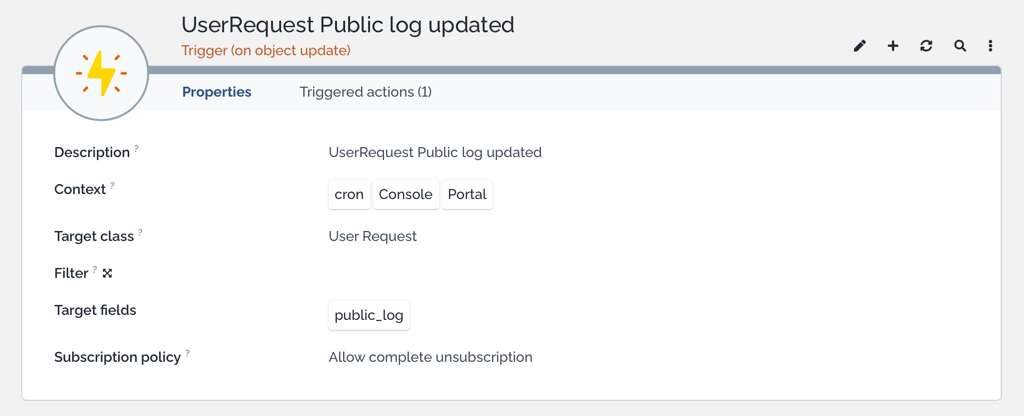
Trigger 2 — user commented:
| Field | Value |
|---|---|
| Type | Trigger (on object update) |
| Target class | UserRequest |
| Context | cron, Console, Portal |
| Target fields | public_log |
Important
Set Context to cron, Console, and Portal only — do not include REST/JSON. This prevents the trigger from firing when the assistant itself posts a comment via the API, which would cause an infinite loop.
4. Create webhooks
In iTop, go to Configuration → Notifications → Remote Application Connections and create a connection for the assistant. The URL is the assistant as reachable from the iTop server — in the bundled compose stack, http://assistant:8000. If you set a WEBHOOK_TOKEN, configure the connection to send it in the X-Auth-Token header.
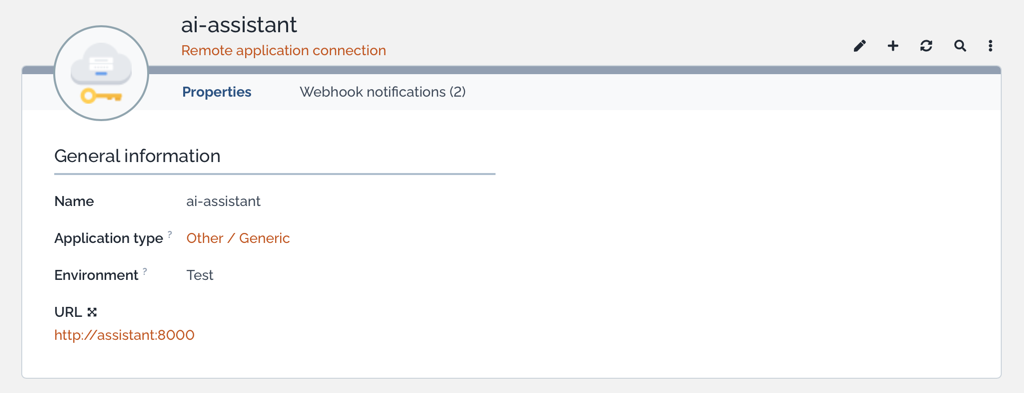
For each trigger, create a Webhook action that sends a POST to the assistant:
Webhook 1 — ticket created (POST http://assistant:8000/webhook):
Webhook 2 — user commented (POST http://assistant:8000/webhook):
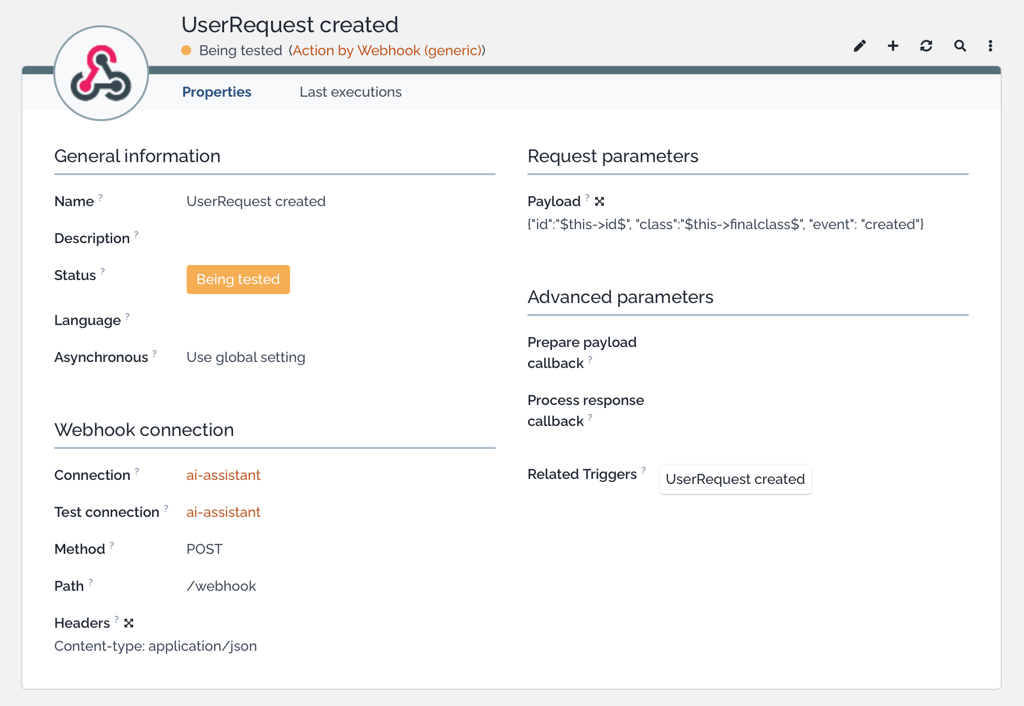
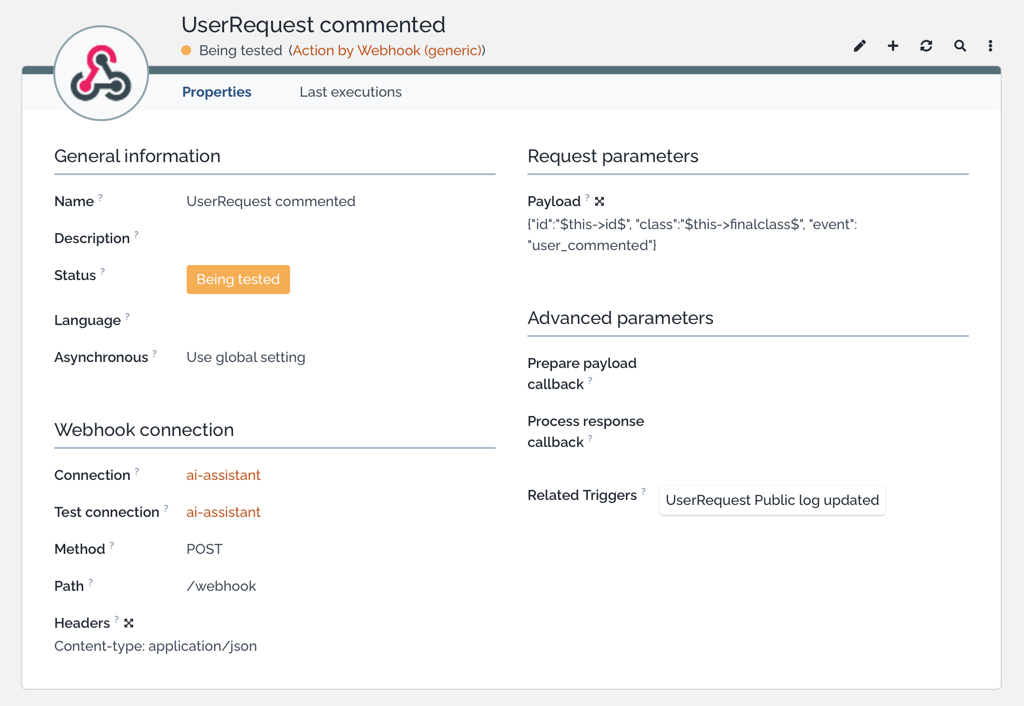
Repeat both for every class the assistant handles (Incident by default, alongside UserRequest) — or use a single creation trigger on Ticket with the filter SELECT Ticket WHERE finalclass IN ('UserRequest', 'Incident'), which is what the wizard does.
Optional third trigger. The assistant also understands "event": "assigned" — on receiving it, it marks the ticket as no longer its business without calling iTop or the LLM. It is purely an optimization: the guard reaches the same conclusion from the ticket status anyway. Wire it to a trigger on agent_id changes if you want to save those API calls.
Automated provisioning (CLI)
The same iTop objects can be created via the CLI — useful for scripted deployments:
# from a local checkout
cd assistant && uv run itop-ai-provision \
  --itop-url http://localhost:8000/webservices/rest.php --user admin \
  --backend-url http://assistant:8000 --webhook-token <WEBHOOK_TOKEN>

# or inside the Docker stack
docker compose exec assistant itop-ai-provision \
  --itop-url http://itop/webservices/rest.php --user admin \
  --backend-url http://assistant:8000 --webhook-token <WEBHOOK_TOKEN>
--backend-url is the assistant URL as reachable from the iTop server (in the bundled compose stack, that is http://assistant:8000).